Connecting your AdSense account to Google Ad Manager (GAM) is simple, but there are some pitfalls that most publishers aren’t aware of. In this article, we’re going to address some of the confusion when it comes to linking Adsense to AdManager.
Linked accounts
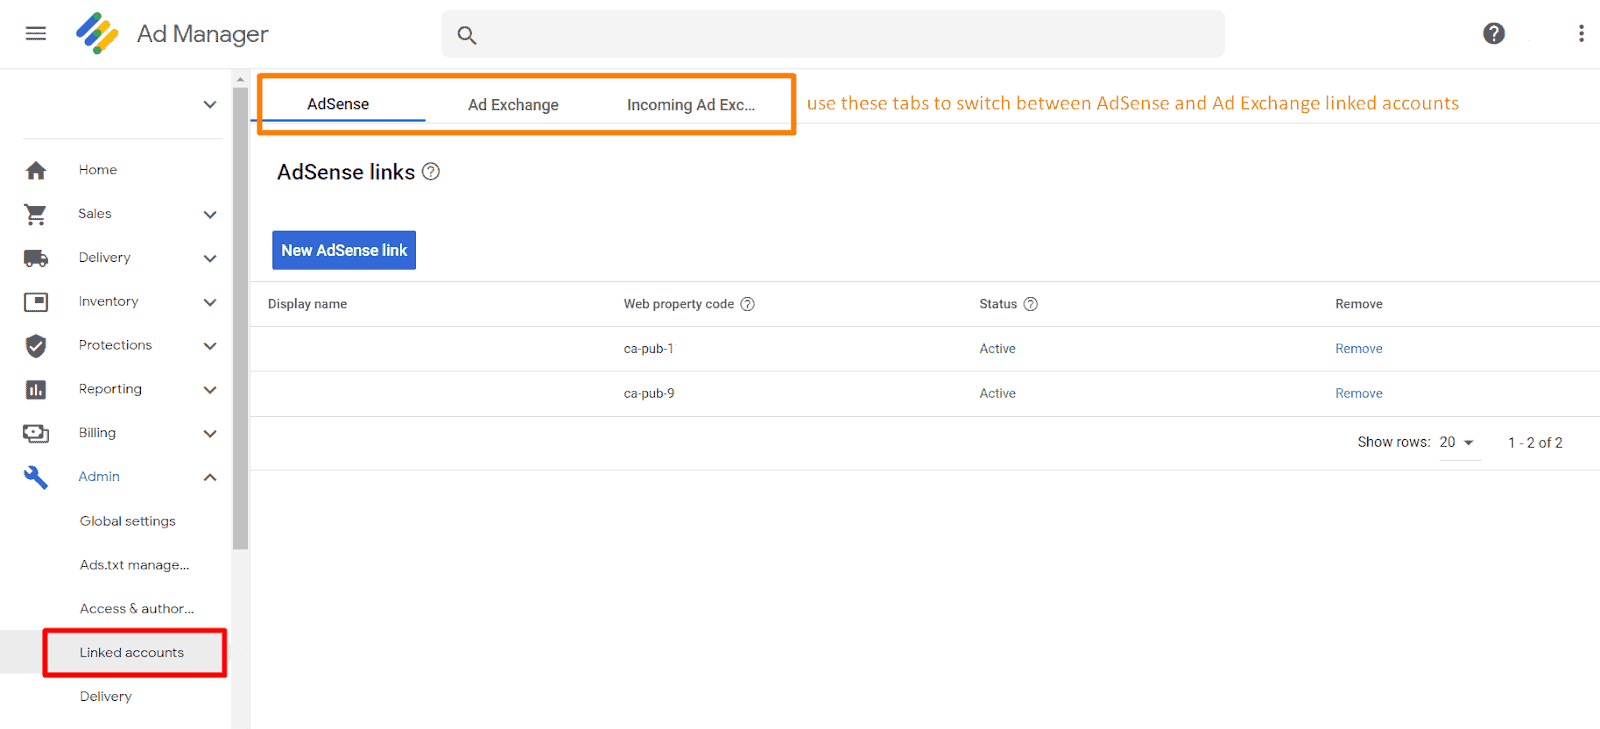
If you’re linking a second Adsense, or an AdExchange account, or want to view your linked accounts, this can be done in the Admin section of Google Ad Manager, as shown in the image below:

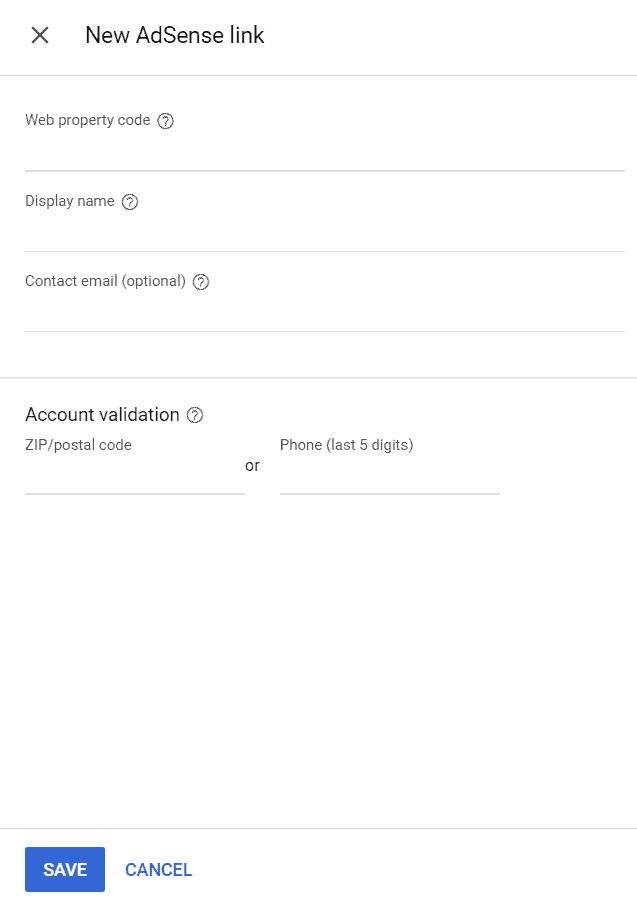
Click ‘New Adsense link,’ and you’re presented with the ‘New AdSense link’ screen as shown below. Enter the property ID of the AdSense account you want to link to. You can find this in the admin section of that AdSense account, most commonly known as the “pub ID.” A useful display name that will help you refer to the link in the future, the contact email address of the linked account, and either the ZIP or phone number associated with the linked AdSense account (this is to verify that you have access to that account granted by the owner of it).

After you’ve hit save, don’t forget to authorize the link (or ask the owner to authorize it). To do this, log into the linked AdSense account and go to the Settings menu. Go to ‘Access and authorization’ -> ‘Third-party access’ and look for the message indicating that someone has requested access to the account, and click to approve the request.
No linked accounts section?
The biggest stumbling block to the above steps is that a lot of publishers, including most new publishers, do not have access to the linked accounts section (i.e., ‘linked accounts’ does not appear in the Admin menu in GAM. This section is not enabled by default during the creation of a GAM account, and can only be enabled by Google.
So if you have just joined Google Ad Manager (GAM) and have no linked account section, how do you connect your AdSense account to GAM and serve AdSense ads via GAM alongside your other demand sources?
Enabling the linked accounts section
If you can contact Google directly, they will enable the section for you, but Google support options are not normally available for small/medium publishers. If you log into your Google Ad Manager account and then go to https://support.google.com/admanager/answer/3059042, the available options for your account will be shown at the bottom of the page. If you have the option to email or chat to Google, tell them what you need, and they will update your account.
No linked accounts section and no support options?
New GAM users often ask us how to link their AdSense account to Google Ad Manager to serve Adsense ads alongside the rest of their demand sources (direct deals, third-party ad networks, etc.). However, if you’ve just signed up for GAM, it already contains a link to your AdSense.
You can’t sign up for GAM without already having an AdSense account, so when you sign up for Google Ad Manager, the program checks whether the sign-up email matches a valid and approved Adsense account. This link still exists even though you can’t see it. If you were to create an ad unit in GAM, traffic it on a page, and check the box in the ad unit settings allowing AdSense to fill unsold inventory, AdSense ads would start to show, and the earnings would eventually show in your AdSense account.
This means that if you just have an AdSense account and a new Google Ad Manager account, you don’t need to link them; they’re already linked.
Creating an AdSense line item
We recommend creating an AdSense line item instead of using the fill unsold inventory checkbox. You might see guides online leading you through the steps of this that show ‘AdSense’ as a line item type along with Standard, Price Priority, etc., but the chances are that you don’t have this line item type available.
If you aren’t able to select the AdSense line item type, there’s a workaround. First, create an ad tag in Adsense in the usual way, and save the tag in a notepad file. Go back to Google Ad Manager and create an order and line item precisely as you would for any other third-party ad network (which is what AdSense is, in this instance), using ‘Price Priority’ as the line item type.
Once you’ve selected your dates and targeting settings, you need to add the creative. Select ‘third party’ for the creative type and paste in the AdSense tag you created earlier. You can now run reports in Google Ad Manager for your AdSense orders. Bear in mind that there will be a discrepancy between the earnings shown in Google Ad Manager and those shown in AdSense. You’ll be paid the amount shown in AdSense.
Optimize each tag or line item based on its “True CPM” calculated as:
True CPM = (AdSense Revenue for the tag/GAM impressions for the tag)*1,000
Conclusion
Here’s a summary of the steps to connect AdSense with Google Ad Manager again:
1-Sign in to Google Ad Manager: Access your Google Ad Manager account and navigate to the “Inventory” tab.
2-Create a New Ad Exchange Account: Under the “Ad Exchange” section, select “AdSense” and click on “Link your AdSense account.”
3-Connect AdSense Account: Follow the on-screen instructions to connect your AdSense account with Google Ad Manager. Ensure that the correct AdSense account is selected.
4-Enable Dynamic Allocation: To maximize revenue, enable Dynamic Allocation in Google Ad Manager. Go to “Delivery” > “Network settings” and enable the “Dynamic Allocation” option.
By integrating AdSense with Google Ad Manager, you’ll gain better control over your ad inventory, improved ad targeting, and increased revenue potential. Linking AdSense accounts, enabling the linked accounts section, and setting up AdSense line items can be confusing if you’re new to Google Ad Manager. Why not focus on what you do best and let the ad ops experts manage it all for you? Not only will we take care of everything mentioned above, but we’ll also help maximize your ad revenue! Sign up for a Premium account at MonetizeMore today!
source https://www.monetizemore.com/blog/how-connect-adsense-google-ad-manager/


0 Comments